
Introduction
Modern aircraft often have GPS, moving maps, digital displays, and advanced navigation systems. These tools are very helpful, but every student pilot must still learn manual navigation skills.
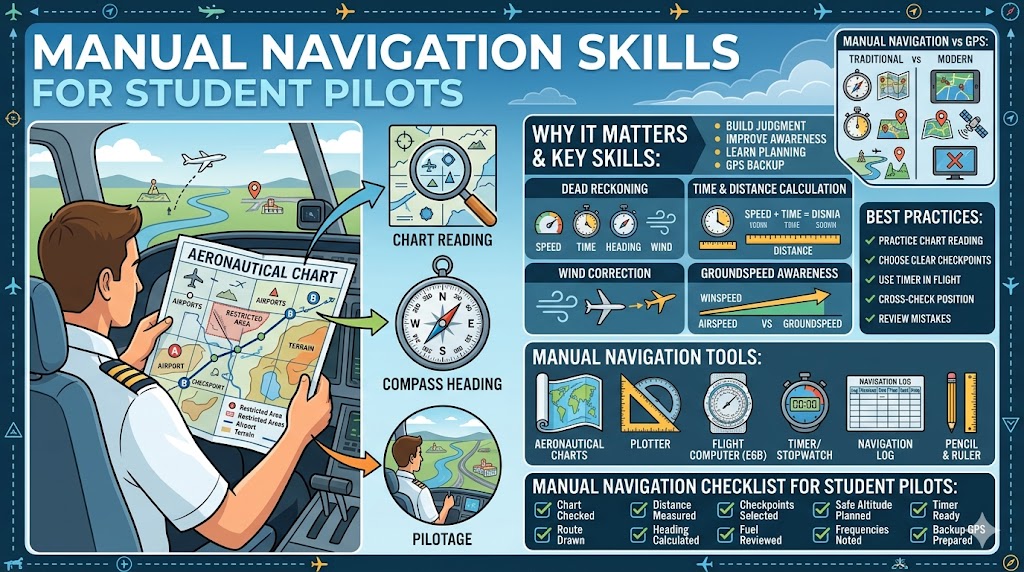
Manual navigation skills for student pilots are important because they teach pilots how to understand direction, distance, time, wind, landmarks, charts, and aircraft position without depending only on technology.
A GPS can show the route, but a pilot must still know how to think, plan, cross-check, and make safe decisions. If GPS stops working, the screen freezes, the battery fails, or the pilot enters the wrong waypoint, manual navigation knowledge becomes very important.
Manual navigation builds confidence. It helps student pilots understand where they are, where they are going, and what they should do if the flight does not go exactly as planned.
This guide explains manual navigation in simple language for beginner pilots, aviation students, and flight training learners.
What Is Manual Navigation in Aviation?
Manual navigation in aviation means using basic pilot skills and tools to guide an aircraft safely from one place to another.
Instead of depending only on GPS, pilots use:
- Aeronautical charts
- Compass headings
- Heading indicator
- Visual landmarks
- Time and distance calculations
- Wind correction
- Flight computer or E6B
- Navigation log
- Plotter
- Radio frequencies
- Alternate airport planning
Manual navigation helps pilots understand the route deeply. It teaches them how to read the sky, the ground, the chart, and the instruments together.
For student pilots, manual navigation is a foundation skill. It helps them become safe, confident, and independent pilots.
Why Manual Navigation Skills Matter for Student Pilots
Manual navigation is not old-fashioned. It is still one of the most important parts of pilot training.
Building Strong Pilot Judgment
Manual navigation teaches students to think before and during flight. They learn to ask important questions:
- Am I on the correct route?
- Is my heading accurate?
- Is wind pushing me off track?
- What landmark should I see next?
- What airport can I use if plans change?
This kind of thinking builds strong pilot judgment.
Understanding Direction and Distance
Student pilots must understand headings, bearings, miles, speed, and time. Manual navigation helps them connect these ideas in a practical way.
Improving Situational Awareness
Situational awareness means knowing what is happening around the aircraft. Manual navigation improves awareness because pilots must compare charts, instruments, landmarks, and time estimates.
Learning Flight Planning Basics
Before every navigation flight, pilots must plan the route, measure distance, calculate heading, check airspace, and prepare alternate options. These skills are essential in pilot training.
Handling GPS or Equipment Failure
GPS and digital tools are useful, but they can fail. Manual navigation gives pilots backup confidence.
Avoiding Overdependence on Technology
If student pilots depend only on GPS, they may not develop strong chart reading and decision-making skills. Manual navigation keeps the pilot actively involved.
Understanding Wind Drift and Correction
Wind can push an aircraft away from the planned route. Manual navigation helps student pilots understand how wind affects flight path.
Preparing for Cross-Country Flights
Cross-country flying requires route planning, checkpoint tracking, time management, and diversion planning. Manual navigation prepares students for these flights.
Key Manual Navigation Skills Student Pilots Must Learn
Student pilots learn manual navigation step by step. Each skill supports safe flying and better decision-making.
1. Aeronautical Chart Reading
Aeronautical charts are special aviation maps used by pilots. They show important flight information such as airports, airspace, terrain, obstacles, navigation aids, restricted areas, roads, rivers, cities, and landmarks.
A student pilot must learn how to read:
- Airport symbols
- Airspace boundaries
- Terrain elevation
- Obstacle markings
- Radio frequencies
- Navigation aids
- Restricted and prohibited areas
- Visual landmarks
Chart reading helps pilots understand the route before takeoff and during flight.
2. Compass Heading
A compass heading is the direction in which the aircraft is flying, measured in degrees.
For example:
- 000 or 360 degrees means north
- 090 degrees means east
- 180 degrees means south
- 270 degrees means west
Student pilots use the magnetic compass and heading indicator to maintain direction.
Compass heading is important because pilots must fly the planned direction to reach the destination or checkpoint.
3. Pilotage
Pilotage means navigating by looking outside the aircraft and comparing visible landmarks with the aeronautical chart.
Common landmarks include:
- Roads
- Rivers
- Lakes
- Railway lines
- Towns
- Bridges
- Coastlines
- Mountains
- Large buildings
- Fields
For example, if the chart shows a river crossing a highway, the pilot can look outside and confirm the aircraft’s position when that landmark appears.
Pilotage is very useful for visual flight training.
4. Dead Reckoning
Dead reckoning is a manual navigation method that estimates aircraft position using heading, speed, time, and wind correction.
In simple words, the pilot calculates:
- Which direction to fly
- How fast the aircraft is moving over the ground
- How long it will take to reach the next checkpoint
- How wind may push the aircraft away from the route
Dead reckoning teaches student pilots how to navigate even when there is no GPS available.
5. Time and Distance Calculation
Time and distance calculation is a basic but important navigation skill.
Pilots need to know:
- How far the next checkpoint is
- How long it will take to reach it
- Whether the aircraft is ahead or behind schedule
- How much fuel may be used
For example, if an aircraft is traveling at 90 knots groundspeed and the next checkpoint is 30 nautical miles away, the pilot can estimate that it will take about 20 minutes to reach that point.
This helps pilots monitor progress during flight.
6. Wind Correction
Wind affects aircraft movement. Even if the aircraft nose is pointing in the correct direction, wind can push it left or right.
This is called drift.
Wind correction means adjusting the aircraft heading to stay on the planned route.
For example, if wind is coming from the left, the pilot may need to point the aircraft slightly into the wind to maintain the correct ground track.
Student pilots must learn wind correction because wind is always a factor in real flying.
7. Groundspeed Awareness
Airspeed and groundspeed are not the same.
Airspeed is the speed of the aircraft through the air. Groundspeed is the speed of the aircraft over the ground.
Wind affects groundspeed.
- A tailwind increases groundspeed.
- A headwind reduces groundspeed.
- A crosswind can push the aircraft sideways.
Groundspeed is important because it affects time, fuel planning, and estimated arrival.
8. Checkpoint Planning
Checkpoints are selected points along a route that help pilots confirm position.
Good checkpoints should be easy to see from the air.
Examples include:
- A large river bend
- A highway crossing
- A lake
- A town
- A railway junction
- A coastline
- A large bridge
- A major road intersection
Weak checkpoints should be avoided. Small roads, tiny villages, or similar-looking fields may be difficult to identify from the air.
9. Altitude Planning
Altitude planning is an important part of manual navigation.
Pilots must choose an altitude that provides safe clearance from:
- Terrain
- Towers
- Buildings
- Hills
- Mountains
- Restricted airspace
- Weather and clouds
Student pilots must also consider aircraft performance, visibility, direction of flight, and airspace rules.
A safe altitude gives the pilot more time and options if something unexpected happens.
10. Diversion Planning
Diversion planning means changing the route during flight and going to another airport or safe location.
A diversion may be needed because of:
- Bad weather
- Low fuel
- Aircraft problem
- Closed runway
- Strong wind
- Airspace restriction
- Passenger or training requirement
Student pilots must learn how to quickly choose a new airport, estimate heading, calculate time, check fuel, and communicate properly.
Diversion planning is one of the most practical manual navigation skills.
Manual Navigation Tools Used by Student Pilots
Manual navigation requires simple but important tools. These tools help student pilots plan and fly safely.
Aeronautical Charts
Charts show airports, airspace, terrain, obstacles, landmarks, and navigation information.
Magnetic Compass
The magnetic compass shows basic direction. It is useful as a backup and foundation tool.
Heading Indicator
The heading indicator helps pilots maintain a steady heading during flight.
Plotter
A plotter is used to measure route direction and distance on an aeronautical chart.
Flight Computer or E6B
An E6B or flight computer helps calculate wind correction, groundspeed, time, distance, and fuel.
Stopwatch or Timer
A timer helps pilots check whether they are reaching checkpoints at the expected time.
Navigation Log
A navigation log records route details such as heading, distance, time, fuel, checkpoints, and frequencies.
Pencil and Ruler
These are simple tools used for marking routes, checkpoints, and calculations.
Airport Information
Student pilots must check airport elevation, runway length, frequencies, and services.
Radio Frequencies
Frequencies are needed for communication with tower, ground, approach, flight service, and other aircraft.
Manual Navigation Skills Comparison Table
| Manual Navigation Skill | Main Purpose | Student Pilot Benefit |
|---|---|---|
| Chart Reading | Understand route, airspace, terrain, and airports | Builds route awareness |
| Compass Heading | Maintain planned direction | Helps control aircraft direction |
| Pilotage | Navigate using visible landmarks | Improves outside awareness |
| Dead Reckoning | Estimate position using heading, speed, time, and wind | Builds independent navigation skill |
| Time Calculation | Estimate arrival at checkpoints | Helps monitor progress |
| Wind Correction | Adjust heading for wind drift | Keeps aircraft on route |
| Groundspeed Awareness | Understand speed over ground | Improves fuel and time planning |
| Checkpoint Planning | Select visual points along the route | Helps confirm position |
| Altitude Planning | Maintain safe height above terrain and obstacles | Improves safety |
| Diversion Planning | Change route when needed | Builds emergency decision-making |
Manual Navigation vs GPS Navigation
GPS is a powerful tool, but manual navigation teaches a pilot how to think.
| Point | Manual Navigation | GPS Navigation |
|---|---|---|
| Main Method | Uses charts, compass, landmarks, time, and calculations | Uses satellite-based position and digital route |
| Skill Development | Builds strong pilot judgment | Supports awareness and convenience |
| Technology Dependence | Low | High |
| Backup Value | Very strong | Can fail if system or power is lost |
| Training Benefit | Teaches planning and decision-making | Helps confirm position and route |
| Best Use | Foundation skill and backup navigation | Modern support tool |
Student pilots should not think of manual navigation and GPS as enemies. Both are useful. The safest pilots know how to use both together.
How Student Pilots Use Manual Navigation During Flight Training
Manual navigation starts before takeoff. A student pilot must prepare carefully on the ground.
1. Select Departure and Destination Airports
The pilot first chooses the starting airport and destination airport.
2. Study the Aeronautical Chart
The pilot checks airports, airspace, terrain, obstacles, restricted areas, and landmarks.
3. Draw the Route
A route line is drawn between the departure and destination points.
4. Measure Distance
The pilot measures the distance between points using a plotter or chart scale.
5. Calculate Heading
The pilot calculates the planned heading and adjusts for magnetic variation if required.
6. Check Wind Correction
The pilot checks wind direction and speed to calculate correction.
7. Select Visual Checkpoints
The pilot chooses clear landmarks along the route.
8. Prepare Navigation Log
The navigation log includes heading, distance, estimated time, fuel, checkpoints, and frequencies.
9. Note Frequencies and Airspace
The pilot writes down communication frequencies and reviews airspace requirements.
10. Monitor Progress During Flight
During flight, the pilot checks time, landmarks, heading, and position. If the aircraft is off route, the pilot corrects early.
Step-by-Step Example of Manual Navigation
Imagine a student pilot planning a short cross-country flight from Airport A to Airport B.
First, the student finds both airports on the aeronautical chart. The student checks runway length, airport elevation, and communication frequencies.
Next, the student draws a straight route line between the two airports. Along the route, the student notices a river, a highway crossing, and a small town. These are selected as checkpoints.
The student then measures the distance between each checkpoint. Using the aircraft’s expected groundspeed, the student estimates how many minutes it will take to reach each point.
After that, the student checks the wind. If wind is coming from the right, the student calculates a small correction and plans to point the aircraft slightly into the wind.
The student prepares a navigation log with:
- Route legs
- Headings
- Distances
- Estimated times
- Frequencies
- Checkpoints
- Alternate airport
During the flight, the student starts a timer after takeoff. After a few minutes, the student looks outside and identifies the first checkpoint. The time is close to the planned estimate, so the student knows the aircraft is on track.
Later, the student notices the second checkpoint appears slightly left of the aircraft. This means the aircraft may have drifted right. The student corrects heading and confirms the position again using the chart.
This example shows how manual navigation helps student pilots think, observe, correct, and fly safely.
Common Manual Navigation Mistakes Student Pilots Make
Manual navigation takes practice. Beginner pilots may make mistakes, but training helps correct them.
Not Studying the Chart Properly
Some students draw a route but do not fully check airspace, obstacles, or terrain. This can create problems during flight.
Choosing Weak Checkpoints
Small or unclear landmarks are difficult to identify from the air. Strong checkpoints should be large and easy to recognize.
Forgetting Wind Correction
Wind can push the aircraft away from the planned route. Ignoring wind correction can lead to navigation errors.
Misreading Compass Headings
A small heading mistake can become a large route error over distance. Students should check headings carefully.
Not Checking Airspace
Entering controlled or restricted airspace without preparation is unsafe. Airspace must always be reviewed.
Ignoring Terrain and Obstacles
Terrain and towers must be checked before flight. Safe altitude planning is important.
Failing to Update Time Estimates
If the aircraft is slower or faster than expected, arrival times must be updated.
Depending Too Much on GPS
GPS is useful, but students must practice manual skills to become confident pilots.
Not Preparing Alternate Airports
A flight plan should include backup options in case the destination is not suitable.
Poor Navigation Log Preparation
An incomplete navigation log can increase cockpit workload. Proper preparation makes flying easier.
Tips to Improve Manual Navigation Skills
Manual navigation improves with regular practice. Student pilots should build skills slowly and carefully.
Practice Chart Reading Regularly
Spend time reading aeronautical charts even when not flying. Learn symbols, airports, airspace, and landmarks.
Start With Short Routes
Short routes are easier for beginners. They help students build confidence before longer cross-country flights.
Choose Clear Checkpoints
Use large and visible landmarks such as rivers, highways, lakes, towns, and coastlines.
Use a Timer During Flight
Timing helps pilots confirm whether they are reaching checkpoints as planned.
Compare Planned Time With Actual Time
If a checkpoint appears early or late, the pilot should understand why. Wind or groundspeed may be different than expected.
Understand Wind Direction
Wind correction is easier when the pilot understands where the wind is coming from and how it affects the aircraft.
Cross-Check Position Often
Do not wait too long to confirm position. Check heading, chart, landmarks, and time regularly.
Practice Without GPS Under Instructor Guidance
With instructor approval, practice manual navigation without looking at GPS. This builds confidence.
Review Mistakes After Every Flight
After landing, review what went well and what needs improvement.
Ask Instructors for Real Navigation Exercises
Flight instructors can create practice scenarios such as diversions, lost procedures, and checkpoint tracking.
Manual Navigation Checklist for Student Pilots
Use this checklist before a manual navigation flight.
Route Preparation
- Current aeronautical chart checked
- Departure airport identified
- Destination airport identified
- Route drawn
- Distance measured
- Checkpoints selected
- Alternate airport selected
Heading and Timing
- Compass heading calculated
- Wind correction reviewed
- Groundspeed estimated
- Time between checkpoints calculated
- Estimated arrival time planned
- Fuel requirement reviewed
Airspace and Safety
- Controlled airspace checked
- Restricted areas reviewed
- Terrain checked
- Obstacles checked
- Safe altitude selected
- Weather reviewed
Navigation Tools
- Magnetic compass checked
- Heading indicator checked
- Plotter available
- Flight computer or E6B available
- Timer ready
- Navigation log prepared
- Pencil available
Communication and Backup
- Frequencies written down
- ATC requirements reviewed
- Alternate airport information noted
- GPS backup prepared
- Instructor briefing completed
Why Manual Navigation Builds Better Pilots
Manual navigation builds real pilot thinking. It helps students understand how the aircraft moves across the ground, how wind affects the route, and how to identify position without simply following a screen.
A student pilot who practices manual navigation becomes better at:
- Planning routes
- Reading charts
- Recognizing landmarks
- Estimating time
- Managing fuel
- Correcting drift
- Avoiding airspace mistakes
- Making backup decisions
- Staying calm during equipment failure
This is why manual navigation remains an essential part of student pilot training.
FAQs About Manual Navigation Skills for Student Pilots
1. What are manual navigation skills for student pilots?
Manual navigation skills are basic pilot skills used to navigate without depending only on GPS. They include chart reading, compass headings, pilotage, dead reckoning, wind correction, checkpoint planning, and time calculation.
2. Why should student pilots learn manual navigation?
Student pilots should learn manual navigation because it builds confidence, improves situational awareness, and prepares them for GPS or equipment failure.
3. Is manual navigation still useful when GPS is available?
Yes, manual navigation is still useful. GPS is helpful, but pilots must understand charts, compass headings, landmarks, and backup planning.
4. What is pilotage in aviation?
Pilotage is navigation by using visible landmarks. A pilot compares roads, rivers, towns, lakes, and other landmarks with the aeronautical chart.
5. What is dead reckoning?
Dead reckoning is estimating aircraft position using heading, speed, time, and wind correction. It helps pilots navigate without relying only on electronic systems.
6. Why is wind correction important?
Wind can push an aircraft away from the planned route. Wind correction helps pilots stay on the correct track.
7. What tools are used for manual navigation?
Manual navigation tools include aeronautical charts, magnetic compass, heading indicator, plotter, flight computer or E6B, timer, navigation log, pencil, and airport information.
8. How do student pilots choose checkpoints?
Student pilots should choose checkpoints that are large, clear, and easy to see from the air, such as rivers, highways, towns, lakes, railway lines, and coastlines.
9. What happens if GPS fails during flight?
If GPS fails, the pilot should use charts, compass headings, visual landmarks, time estimates, radio navigation if available, and ATC support if needed.
10. How can beginners improve manual navigation skills?
Beginners can improve by practicing chart reading, planning short routes, using timers, choosing clear checkpoints, understanding wind, and flying manual navigation exercises with an instructor.
Conclusion
Manual navigation skills for student pilots are essential for safe and confident flight training. GPS and modern cockpit systems are useful, but they should not replace basic pilot knowledge.
Student pilots must learn how to read aeronautical charts, fly compass headings, use visual landmarks, calculate time and distance, correct for wind, plan checkpoints, prepare navigation logs, and choose alternate airports.
Manual navigation teaches pilots how to think, cross-check, and make better decisions. It also prepares them for situations where GPS or electronic systems may fail.
A safe pilot uses modern tools wisely, but also understands traditional navigation. For every student pilot, manual navigation is not just a training requirement. It is a foundation for becoming a confident, aware, and responsible pilot.
