
Introduction
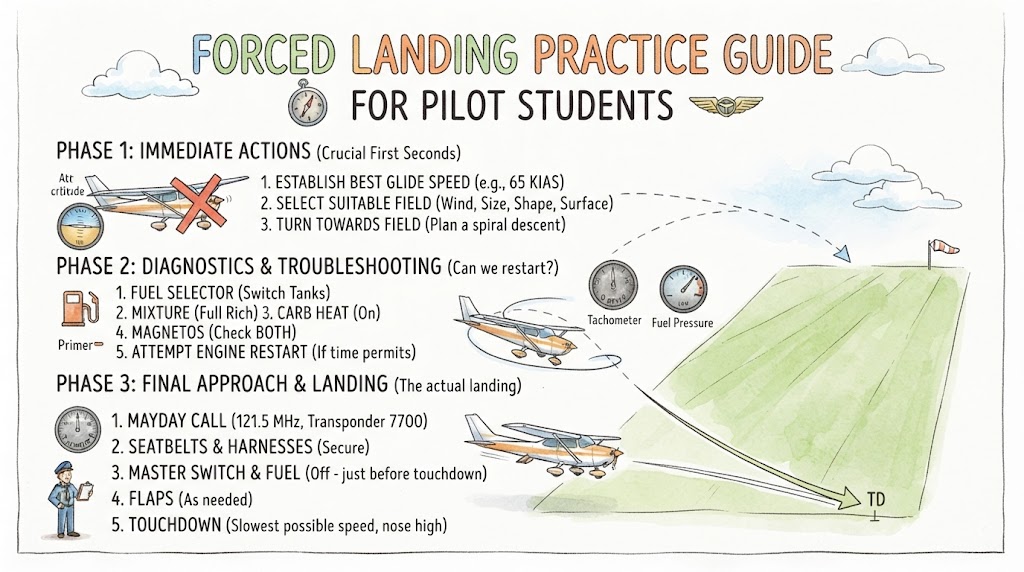
Forced landing practice is an important part of student pilot training because it teaches pilots how to manage an aircraft safely when normal powered flight may no longer be possible. The exercise develops aircraft control, glide management, landing-area selection, cockpit discipline, situational awareness and decision-making under pressure. In the FAA private-pilot framework, a simulated emergency approach includes maintaining the recommended best-glide speed, selecting a suitable landing area, planning a safe flight path, preparing for landing and completing the appropriate checklist. However, every aircraft and training environment is different, so students must always follow the aircraft’s Pilot’s Operating Handbook or Airplane Flight Manual, official checklists and their instructor’s directions.
Understanding a Forced Landing
A forced landing is an emergency landing made because a condition outside the pilot’s normal control prevents continued safe flight. It is commonly associated with a complete or partial loss of engine power, although other serious aircraft problems may also make a landing necessary.
The main purpose of forced landing training is not to teach students how to find a perfect field. It is to teach them how to maintain control, protect available energy and position the aircraft for the safest possible landing in the circumstances.
A simulated forced landing is a training exercise. The engine normally continues operating at a reduced power setting selected by the instructor, and the exercise is stopped or recovered from before safety margins are compromised. FAA guidance states that a simulated emergency landing approach should be ended once the instructor or evaluator can determine whether a safe landing is assured.
Forced Landing and Precautionary Landing Differences
Students should understand the difference between a forced landing and a precautionary landing.
| Landing Type | General Meaning | Available Planning Time | Typical Training Focus |
|---|---|---|---|
| Forced landing | A landing made because continued flight is no longer safely possible | Often limited | Aircraft control, glide performance and immediate landing decisions |
| Precautionary landing | A planned landing made before a developing problem becomes an emergency | Usually greater | Site inspection, approach planning and early risk reduction |
| Ditching | An emergency landing made on water | Depends on circumstances | Aircraft configuration, wind, waves, evacuation and survival |
A precautionary landing is generally less hazardous because the pilot normally has more time to choose terrain, inspect the area and plan the approach.
Why Forced Landing Practice Matters
A pilot may understand emergency procedures in a classroom but still struggle to apply them when the engine sound changes, altitude decreases and several decisions must be made quickly.
Practice helps students develop the ability to:
- Control the aircraft immediately
- Establish the correct aircraft-specific glide speed
- Identify reachable landing areas
- Consider wind, terrain and obstacles
- Plan an organised descent
- Use checklists without losing situational awareness
- Decide when troubleshooting should stop
- Communicate efficiently
- Prepare passengers
- Recover safely from the simulation
The current FAA private-pilot standards evaluate both technical skill and risk management. They include hazards such as low-altitude manoeuvring, distraction, task prioritisation, loss of situational awareness and controlled flight into terrain.
The Main Priorities During a Forced Landing
Students are commonly taught to organise emergency actions around three priorities:
Aviate
Maintain positive aircraft control. Establish the correct attitude and airspeed before looking for checklists, operating controls or making radio calls.
Navigate
Select a suitable landing area and position the aircraft so that it remains reachable.
Communicate
Inform air traffic control or other relevant stations when time and workload permit.
| Priority | Student Action | Common Error |
|---|---|---|
| Aviate | Control attitude, airspeed and bank | Looking inside the cockpit while speed decreases |
| Navigate | Choose and maintain a flight path toward a landing area | Selecting an area outside realistic glide range |
| Communicate | Make a brief emergency call when able | Giving a long radio message before controlling the aircraft |
Communication resources can be valuable during an emergency, but FAA standards continue to place aircraft control first while pilots select frequencies and obtain assistance.
Preparing for Forced Landing Practice
A forced landing exercise should begin before the aircraft leaves the ground.
The student and instructor should discuss:
- The purpose of the exercise
- Who controls the throttle
- The minimum recovery altitude
- The selected practice area
- Weather and wind conditions
- Terrain and obstacle risks
- Nearby airports
- Traffic awareness
- The aircraft-specific checklist
- The instructor’s recovery command
- Go-around procedures
- Actions if a real engine problem occurs
The instructor must ensure that the practice area allows a safe landing if an actual engine failure occurs during the exercise. This safety requirement is specifically included in the FAA Flight Instructor Airman Certification Standards.
Choosing a Suitable Practice Area
Forced landing practice should not be conducted over random or unfamiliar terrain without proper planning.
A suitable practice area should normally provide:
- Adequate altitude
- Suitable visibility
- Acceptable wind
- Low traffic risk
- Several possible landing areas
- Clear recovery options
- Space for safe manoeuvring
- Compliance with local regulations
- No unnecessary risk to people or property on the ground
The exercise should also avoid locations where a low approach may disturb people, animals or property. Local restrictions, flight-school procedures and aviation rules must always be followed.
Instructor Responsibilities During the Exercise
The instructor is responsible for maintaining safety throughout the simulated emergency.
The instructor should:
- Clear the surrounding area for traffic
- Check the student’s altitude and position
- Introduce the scenario at an appropriate time
- Prevent unsafe cockpit actions
- Monitor airspeed and bank angle
- Watch for fixation or confusion
- Protect the throttle from accidental shutdown
- Ensure the selected field remains reachable
- Announce recovery clearly
- Take control immediately when necessary
The student should never shut down the engine, move fuel controls, switch off ignition systems or carry out other critical actions unless specifically authorised and safely managed by the instructor.
Recognising the Simulated Power Loss
An instructor may begin the exercise by reducing power and announcing a simulated engine failure.
The student should recognise:
- Reduced engine sound
- Loss of thrust
- Lower climb performance
- A tendency for airspeed to decrease
- The need to adjust pitch
- A changing descent path
- The need to prioritise tasks
The student should not wait for the aircraft to become slow before responding. Prompt pitch control protects airspeed and gives the pilot more time to assess the situation.
Establishing Best-Glide Performance
Best-glide speed is the aircraft-specific speed that normally provides the greatest horizontal distance for the altitude available in still-air conditions.
It is important because the wrong speed can reduce the landing options available to the pilot.
Flying Too Slowly
Flying below the recommended glide speed may:
- Reduce stall margin
- Increase the risk of loss of control
- Produce a steeper descent than expected
- Limit manoeuvring options
Flying Too Quickly
Flying significantly above the recommended speed may:
- Increase the rate of descent
- Reduce time available for decision-making
- Make it harder to reach the selected landing area
- Lead to excess energy near touchdown
The FAA private-pilot standards require the applicant to understand the importance of best-glide speed, its relationship to distance, the difference between best glide and minimum sink, and the effects of wind on glide distance.
Use Aircraft-Specific Information
There is no universal best-glide speed. The correct value must come from the aircraft’s approved operating handbook or flight manual.
The speed may also be affected by:
- Aircraft weight
- Wind
- Bank angle
- Turbulence
- Landing gear position
- Flap position
- Propeller condition
- Aircraft damage
Students should avoid using a speed remembered from another aircraft model.
Trimming the Aircraft
Once the correct glide attitude has been established, trimming can reduce control pressure and make it easier for the student to divide attention between:
- Airspeed
- Landing-area selection
- Wind
- Terrain
- Checklist use
- Radio communication
- Approach planning
However, the student must continue monitoring the aircraft. Trim does not control airspeed automatically, and an aircraft can still become too slow or too fast.
Selecting a Landing Area
Selecting the landing area is one of the most important parts of forced landing practice.
A suitable area should be:
- Within realistic glide distance
- Long enough for the aircraft
- Free from major obstacles
- Suitable for the wind
- Reasonably level
- Wide enough for directional control
- Clear of people, animals and traffic
- Reachable without excessive manoeuvring
FAA standards require students to consider altitude, wind, terrain, obstructions and available glide distance when selecting a landing area.
Factors to Check When Assessing a Field
Wind Direction
Landing into the wind usually reduces groundspeed and landing distance. However, terrain, obstacles and field conditions may sometimes make another direction safer.
Possible wind indicators include:
- Smoke
- Water movement
- Windsocks
- Trees and vegetation
- Aircraft groundspeed
- Known airport wind reports
- Drift observed during turns
Field Length
The pilot must judge whether the area provides sufficient landing and stopping distance.
A field may look long from altitude but still be unsuitable because of:
- Rising terrain
- Soft soil
- Crops
- Fences
- Ditches
- Buildings
- Wires
- Trees at the far end
Field Surface
Surface colour and texture may provide clues, but appearances can be misleading.
Possible surfaces include:
- Short grass
- Long crops
- Ploughed soil
- Dry ground
- Wet ground
- Sand
- Roads
- Gravel
- Water
A smooth-looking surface may contain hidden obstacles.
Slope
An uphill landing may help reduce the ground roll, while a steep downhill landing can increase speed and stopping distance. However, strong wind, obstacles and terrain may influence the final choice.
Surrounding Obstacles
Students should actively look for:
- Power lines
- Trees
- Poles
- Buildings
- Fences
- Vehicles
- People
- Animals
- Irrigation equipment
- Uneven ground
Power lines can be difficult to see, especially when the supporting poles are outside the pilot’s immediate area of attention.
Comparing Common Landing Options
Agricultural Fields
Agricultural fields may be large and easy to identify, but crops, irrigation channels, soft soil and fences can create serious risks.
Roads
Roads may appear smooth but can contain vehicles, signs, wires, bridges and sharp turns. A road should not automatically be treated as the safest choice.
Airports and Airstrips
A nearby runway is normally attractive, but the pilot must assess whether it is genuinely reachable. Trying to stretch the glide toward an airport outside safe range can lead to loss of airspeed or an uncontrolled landing short of the runway.
Open Ground
Open land may be suitable when it provides sufficient length, a clear approach and acceptable surface conditions.
Water
A water landing introduces different risks, including waves, wind, aircraft configuration, evacuation and survival. Ditching procedures must be learned from aircraft-specific and authority-approved material.
Committing to the Selected Area
Students sometimes change fields repeatedly because another option appears better during the descent.
Changing the landing area may be reasonable when:
- The first area becomes unreachable
- A serious obstacle is discovered
- Wind assessment changes significantly
- A clearly safer option becomes available
However, frequent changes waste altitude and prevent the pilot from establishing a stable approach. The student should commit to the best reasonable option rather than continue searching for a perfect field.
Planning the Forced Landing Approach
After selecting the landing area, the student must create a flight path that uses the remaining altitude effectively.
The approach should consider:
- Current altitude
- Distance from the field
- Wind direction
- Glide performance
- Terrain
- Obstacles
- Turn requirements
- Desired touchdown point
- Aircraft configuration
- Recovery altitude during training
The FAA standards require the pilot to plan and follow a path to the selected landing area while considering altitude, wind, terrain and obstructions.
Using High, Low and Key Positions
Some flight schools use reference positions such as high key and low key to help students organise an emergency approach. Others teach a modified circuit, continuous assessment or another aircraft-specific method.
These reference points can help students:
- Judge altitude
- Plan turns
- Remain close to the field
- Adjust for wind
- Avoid an excessively long final approach
They should not be treated as fixed positions that work for every aircraft, field or weather condition. The pilot must continue assessing whether the selected landing area is reachable.
Maintaining a Reachable Landing Area
The student should avoid flying so far away that the selected field can no longer be reached.
A useful principle is to keep the landing area within a safe gliding distance while planning the approach.
Common errors include:
- Flying a wide circuit
- Extending downwind too far
- Turning toward the field too late
- Misjudging a strong headwind
- Adding drag before landing is assured
- Making unnecessary manoeuvres
A shorter, controlled approach is usually easier to manage than a long approach that depends on perfect glide performance.
Managing Excess Height
A student who arrives high should use instructor-approved methods to reduce excess altitude while maintaining aircraft control.
Depending on the aircraft and situation, training may discuss:
- Adjusting the flight path
- Shortening or extending parts of the pattern
- Using approved flap settings
- Using a forward slip when permitted
- Changing the turn position
- Selecting a more suitable touchdown point
Configuration and slipping limitations must be verified in the aircraft handbook.
Students should never use steep, uncoordinated turns close to the ground to lose height quickly.
Managing Insufficient Height
When the aircraft appears low, the student should not attempt to stretch the glide by raising the nose and allowing airspeed to decrease.
Instead, the student should:
- Maintain the correct glide speed
- Reduce unnecessary manoeuvring
- Reassess the landing area
- Select a closer suitable area when necessary
- Avoid early flap or landing-gear extension
- Prepare for the safest reachable touchdown point
The aircraft’s available energy cannot be increased by pulling back on the control column.
Using the Emergency Checklist
After aircraft control and landing-area selection are established, the student should use the aircraft-specific emergency checklist when time permits.
The general training sequence may include:
- Maintain aircraft control.
- Establish the recommended glide.
- Select a landing area.
- Position the aircraft toward that area.
- Complete approved immediate actions.
- Verify actions using the emergency checklist.
- Prepare for landing.
- Communicate when appropriate.
This is only a general learning framework. It is not a replacement for the checklist approved for the aircraft.
FAA standards require students to configure the aircraft according to the Pilot’s Operating Handbook or Airplane Flight Manual and complete the appropriate checklists.
Memory Actions and Checklist Verification
Some aircraft have emergency actions that must be recalled immediately. These actions should be memorised only when required by the manufacturer, training organisation or aviation authority.
After completing immediate actions, the pilot should verify them using the checklist when workload permits.
Students should avoid:
- Inventing their own flow
- Copying actions from another aircraft
- Moving critical controls without verification
- Looking inside the cockpit for too long
- Continuing troubleshooting near the ground
Diagnosing the Cause
If altitude and time permit, the pilot may attempt to identify the reason for the power loss.
Possible areas may include:
- Fuel supply
- Fuel selector position
- Mixture setting
- Carburettor heat where applicable
- Ignition controls
- Fuel pump operation
- Engine instruments
- Air intake problems
The correct diagnostic actions depend entirely on the aircraft.
The student must continue flying toward the landing area while troubleshooting. Restart attempts should not cause the pilot to lose the chosen field or neglect airspeed.
Emergency Radio Communication
When time permits, the pilot should make a brief and clear emergency call.
A distress transmission may include:
- “Mayday” when appropriate
- Aircraft identification
- Nature of the emergency
- Position
- Altitude
- Intended landing area
- Pilot’s intentions
- Number of people onboard
- Assistance required
FAA guidance states that a pilot can request assistance by contacting the responsible air traffic facility and stating the nature of the difficulty, intentions and assistance required. Distress communications using “Mayday” receive priority.
Radio procedures, emergency frequencies and transponder codes depend on the country and airspace. Students must learn the procedures required by their local aviation authority.
Passenger Preparation
When workload permits, passengers should receive short and clear instructions.
A passenger briefing may include:
- Tighten seat belts and shoulder harnesses
- Secure loose objects
- Move seats to the correct position
- Keep hands and feet away from controls
- Review emergency exits
- Follow brace instructions
- Leave belongings behind after landing
- Move away from the aircraft after evacuation
The pilot should use simple language and avoid giving passengers more information than they can reasonably follow during the emergency.
Aircraft Configuration Before Landing
Configuration decisions must follow the aircraft checklist and depend on:
- Landing surface
- Wind
- Remaining altitude
- Aircraft type
- Landing gear design
- Flap limitations
- Obstacle clearance
- Fire or fuel-leak risk
Students should not extend high-drag devices until the landing area is assured, unless the approved procedure requires otherwise.
Early configuration may reduce glide distance and remove useful options.
Deciding When the Landing Is Assured
A landing is considered assured when the aircraft is positioned so that the selected area can be reached without depending on power.
At this stage, the pilot may be able to:
- Apply the planned landing configuration
- Adjust the touchdown point
- Complete final checklist items
- Brief passengers
- Make a final radio call
- Prepare for touchdown
During simulation, the instructor should recover before the exercise reaches an unsafe height or position.
Recovering From the Simulation
The recovery or go-around is a critical part of forced landing practice.
The instructor should announce the recovery clearly. The student should then follow the aircraft’s normal go-around or recovery procedure.
This may involve:
- Applying power smoothly
- Controlling pitch
- Managing trim forces
- Maintaining directional control
- Retracting drag devices in the correct stages
- Establishing the recommended climb speed
- Checking engine indications
- Returning to a safe altitude
Sudden power application in an aircraft trimmed for a glide can create strong pitch forces. FAA training guidance warns that a go-around from a simulated forced-landing approach requires positive control, smooth power application and proper trim management to prevent an elevator-trim stall.
When the Instructor Should Stop the Exercise
The instructor should end the practice immediately when:
- Airspeed is unsafe
- Aircraft control is deteriorating
- Traffic creates a conflict
- The student becomes disoriented
- The field is no longer reachable
- The aircraft descends to the recovery limit
- Weather conditions worsen
- The engine does not respond normally
- People, property or animals may be disturbed
- The exercise no longer provides useful training
A training objective never takes priority over safety.
Common Student Mistakes
Delaying the Pitch Change
Students may hesitate after power reduction. This can allow airspeed to fall rapidly.
Looking for a Field Before Controlling the Aircraft
The pilot should establish a safe glide before becoming absorbed in landing-area selection.
Choosing the Nearest Field Without Assessing It
The nearest field may contain wires, slope, crops or other hazards.
Selecting a Field Outside Glide Range
Students often overestimate how far the aircraft can travel, especially into a headwind.
Ignoring Wind
Wind affects glide distance, approach direction and groundspeed.
Flying an Oversized Circuit
A wide pattern may place the aircraft too far from the field.
Extending Flaps Too Early
Premature configuration can reduce glide distance.
Fixating on the Checklist
Checklist use is important, but not at the cost of airspeed, terrain awareness or flight-path control.
Attempting Too Many Restart Actions
Troubleshooting should stop when the landing requires full attention.
Changing Fields Repeatedly
Constant changes can lead to an unstable approach and poor energy management.
Making Steep Low-Level Turns
Excessive bank at low speed increases risk and can lead to loss of control.
Poor Recovery Technique
Rapid power application or incorrect trim management during the simulated go-around can create a dangerous pitch change.
Human Factors During Forced Landing Practice
Startle Response
Even when students know an exercise is planned, the sudden power reduction may delay their response.
Tunnel Vision
The student may focus only on one field, instrument or checklist item.
Task Saturation
Aircraft control, landing selection, troubleshooting and communication may compete for limited attention.
Confirmation Bias
A student may continue believing a distant field is reachable despite evidence that the aircraft is descending short.
Decision Paralysis
Searching for the perfect area can delay commitment until few options remain.
Overconfidence
A successful practice exercise does not mean every real emergency will develop in the same way.
FAA standards specifically identify startle response, distraction, task prioritisation and loss of situational awareness as risks in aircraft emergencies.
Recommended Training Progression
Ground Lesson
Review forced landing principles, aircraft systems, glide performance and checklists.
Cockpit Practice
Locate controls and rehearse checklist use while the aircraft is stationary.
Instructor Demonstration
Observe a complete simulated forced landing while the instructor explains each decision.
High-Altitude Practice
Practise pitch control, best-glide speed and landing-area selection with generous safety margins.
Planned Field Exercise
Fly a complete simulated approach under instructor supervision.
Changing Conditions
Practise with different winds, altitudes and field positions.
Partial-Power Scenarios
Learn how limited power may affect decisions without assuming the engine will continue operating.
Communication Practice
Include radio calls and passenger briefings when workload permits.
Recovery Practice
Practise safe go-around technique from a gliding configuration.
Debriefing
Review decisions, aircraft control, checklist use and possible alternatives.
Scenario-Based Training Examples
Scenario One: Power Loss During Cruise
Objective: Establish the glide and choose a reachable landing area.
Common error: Spending too long diagnosing the problem.
Instructor focus: Airspeed control, field selection and workload management.
Main lesson: Altitude creates time only when the pilot uses it effectively.
Scenario Two: Power Loss Near an Airport
Objective: Decide whether a runway is realistically reachable.
Common error: Fixating on the airport and ignoring closer options.
Instructor focus: Glide range, wind and alternative landing areas.
Main lesson: A prepared runway is useful only when it can be reached safely.
Scenario Three: Strong Wind During the Glide
Objective: Understand how wind affects ground distance.
Common error: Using still-air expectations in a strong headwind.
Instructor focus: Wind assessment and approach positioning.
Main lesson: Best-glide airspeed does not remove the effect of wind on ground track and range.
Scenario Four: Excess Height Near the Field
Objective: Adjust the approach without creating an unstable manoeuvre.
Common error: Using steep turns close to the ground.
Instructor focus: Early planning, controlled configuration and safe altitude management.
Main lesson: Excess height should be managed gradually rather than corrected with aggressive low-level manoeuvres.
Scenario Five: Field Becomes Unsuitable
Objective: Reassess the landing area after discovering an obstacle.
Common error: Delaying the change until very low altitude.
Instructor focus: Situational awareness and timely decision-making.
Main lesson: A landing-area change should be deliberate and made while sufficient altitude remains.
Student Study Checklist
This is a study checklist and not an in-flight emergency checklist.
- Learn the aircraft-specific best-glide speed.
- Study the approved forced landing procedure.
- Know all instructor-approved immediate actions.
- Locate the emergency checklist before flight.
- Understand the effect of wind on glide range.
- Practise assessing field length and surface.
- Learn how to identify wires and obstacles.
- Review emergency radio phraseology.
- Practise passenger briefings.
- Understand the instructor’s recovery command.
- Review the normal go-around procedure.
- Debrief every simulated emergency.
- Repeat training regularly.
Role of the Flight Instructor
A qualified flight instructor helps the student develop safe habits rather than simply complete a manoeuvre.
The instructor should teach students to:
- Control the aircraft before troubleshooting
- Use aircraft-specific procedures
- Judge glide range honestly
- Select practical landing areas
- Manage energy throughout the descent
- Use checklists efficiently
- Recognise human-factor risks
- Communicate clearly
- Recover safely
- Learn from mistakes without becoming overconfident
The exercise should be adapted to the student’s experience and should become more complex only after basic aircraft control is reliable.
Preflight Preparation That Reduces Risk
Careful preflight preparation cannot prevent every emergency, but it can reduce avoidable risks.
Important actions include:
- Checking fuel quantity
- Checking fuel quality
- Confirming the correct fuel grade
- Inspecting fuel caps
- Checking oil quantity
- Looking for leaks
- Reviewing maintenance status
- Completing the engine run-up
- Checking engine instruments
- Confirming aircraft performance
- Reviewing weather
- Identifying emergency landing areas near departure
- Briefing actions after a takeoff emergency
FAA risk-management guidance notes that carrying adequate fuel with a suitable reserve reduces the likelihood of low-fuel emergencies and forced landings.
Actions After an Actual Forced Landing
After the aircraft stops, priorities move from aircraft control to occupant safety.
General considerations include:
- Secure the aircraft using the approved checklist.
- Evacuate when fire, smoke, fuel or another hazard is present.
- Help passengers move away from the aircraft.
- Contact emergency services.
- Provide first aid within the pilot’s training.
- Use emergency or survival equipment.
- Avoid returning to an unsafe aircraft.
- Preserve information about the event.
- Follow local reporting requirements.
- Cooperate with rescue and investigation authorities.
Accident and incident reporting rules differ between countries. Pilots should obtain instructions from the relevant national aviation authority.
Practical Forced Landing Training Plan
| Training Exercise | Skill Developed | Typical Student Error | Instructor Focus | Review Material |
|---|---|---|---|---|
| Ground cockpit drill | Checklist familiarity | Searching for controls too long | Accurate control identification | POH or AFM |
| Best-glide exercise | Airspeed and trim control | Flying too slowly or quickly | Stable glide and outside reference | Performance section |
| Field-selection exercise | Risk assessment | Selecting an unreachable area | Wind, surface, slope and obstacles | Emergency procedures |
| Simulated cruise failure | Workload management | Troubleshooting before selecting a field | Aviate, navigate, communicate | Emergency checklist |
| Pattern-planning exercise | Energy management | Flying too far from the field | Altitude and distance control | Instructor notes |
| Radio-call exercise | Emergency communication | Giving a long message | Clear and brief phraseology | Local communication guide |
| Passenger briefing | Cabin preparation | Giving unclear instructions | Calm and direct communication | Safety briefing |
| Recovery exercise | Go-around control | Rapid power and poor trim control | Smooth power, pitch and configuration | Go-around procedure |
| Post-flight debrief | Decision improvement | Focusing only on the touchdown point | Review of the complete process | Training record |
Frequently Asked Questions
1. What is forced landing practice?
Forced landing practice is an instructor-supervised exercise that simulates a situation in which the aircraft may need to land without normal engine power. It develops aircraft control, glide management, site selection and emergency decision-making.
2. Can a student pilot practise forced landings alone?
No. The exercise should be conducted with a qualified flight instructor or authorised evaluator using appropriate safety limits and procedures.
3. Should the engine be shut down during practice?
Normally, no. Training is generally conducted by reducing power while keeping the engine available for recovery. Students must never shut down an engine unless the aircraft, instructor, organisation and regulations specifically permit a properly controlled exercise.
4. What should a student do first after a simulated power loss?
The first task is to maintain positive aircraft control and establish the aircraft-specific recommended glide condition.
5. How does a pilot select the best landing area?
The pilot considers reachability, wind, length, surface, slope, obstacles, people, terrain and the ability to fly a controlled approach.
6. Is the nearest field always the safest field?
No. A slightly more distant field may have a better surface, fewer obstacles or a safer approach, provided it remains within realistic glide range.
7. When should flaps be extended during a forced landing?
Flaps should be used according to the aircraft handbook and instructor guidance, normally when the landing area is assured and the additional drag will not create an undershoot.
8. Can a pilot stretch the glide by raising the nose?
No. Raising the nose and allowing airspeed to decrease does not create extra energy. It can reduce glide performance and increase stall risk.
9. When should a simulated forced landing be stopped?
The instructor should recover when a safe landing can be assessed, the minimum practice altitude is reached, conditions become unsafe or the training objective has been completed.
10. How often should forced landing procedures be practised?
They should be reviewed regularly as part of recurrent training. The appropriate frequency depends on pilot experience, aircraft type, recent flying activity and instructor recommendations.
Key Takeaways
- Forced landing training must be supervised by a qualified instructor.
- Aircraft control and airspeed come before all other actions.
- Best-glide speed is specific to the aircraft.
- A landing area must be both suitable and reachable.
- Wind, terrain, slope, surface and obstacles all affect field selection.
- The aircraft should remain within gliding distance of the chosen area.
- Checklists should support aircraft control, not replace it.
- Troubleshooting must stop when landing preparation becomes the priority.
- Configuration changes should follow aircraft-specific procedures.
- Simulated recovery requires smooth power, pitch and trim management.
- Frequent practice improves decision-making and cockpit discipline.
Conclusion
Forced landing practice gives pilot students the opportunity to develop calm, structured and safety-focused responses to a serious in-flight problem. A successful exercise depends on maintaining control, establishing the correct glide, selecting a realistic landing area, managing altitude carefully, using the approved checklist and recovering before safety margins are reduced. Regular instructor-led practice also helps students recognise fixation, poor field choices, excessive manoeuvring and other common mistakes before they become established habits. Astropilot.co provides educational aviation content to support pilot learning, but practical forced landing training must always be completed with qualified supervision and aircraft-specific guidance.
Aviation Safety Disclaimer: This article is provided for general aviation education only. It does not replace instruction from a qualified flight instructor, an approved flight-training programme, the aircraft’s Pilot’s Operating Handbook or Airplane Flight Manual, official checklists or guidance issued by the relevant aviation authority. Airspeeds, emergency actions, aircraft limitations, recovery altitudes and legal requirements vary by aircraft, operator and country.
